Friday, 18th April 2025
MCP Run Python (via) Pydantic AI's MCP server for running LLM-generated Python code in a sandbox. They ended up using a trick I explored two years ago: using a Deno process to run Pyodide in a WebAssembly sandbox.
Here's a bit of a wild trick: since Deno loads code on-demand from JSR, and uv run can install Python dependencies on demand via the --with option... here's a one-liner you can paste into a macOS shell (provided you have Deno and uv installed already) which will run the example from their README - calculating the number of days between two dates in the most complex way imaginable:
ANTHROPIC_API_KEY="sk-ant-..." \
uv run --with pydantic-ai python -c '
import asyncio
from pydantic_ai import Agent
from pydantic_ai.mcp import MCPServerStdio

server = MCPServerStdio(
    "deno",
    args=[
        "run",
        "-N",
        "-R=node_modules",
        "-W=node_modules",
        "--node-modules-dir=auto",
        "jsr:@pydantic/mcp-run-python",
        "stdio",
    ],
)
agent = Agent("claude-3-5-haiku-latest", mcp_servers=[server])

async def main():
    async with agent.run_mcp_servers():
        result = await agent.run("How many days between 2000-01-01 and 2025-03-18?")
    print(result.output)

asyncio.run(main())'
I ran that just now and got:
The number of days between January 1st, 2000 and March 18th, 2025 is 9,208 days.
I thoroughly enjoy how tools like uv and Deno enable throwing together shell one-liner demos like this one.
Here's an extended version of this example which adds pretty-printed logging of the messages exchanged with the LLM to illustrate exactly what happened. The most important piece is this tool call where Claude 3.5 Haiku asks for Python code to be executed my the MCP server:
ToolCallPart(
    tool_name='run_python_code',
    args={
        'python_code': (
            'from datetime import date\n'
            '\n'
            'date1 = date(2000, 1, 1)\n'
            'date2 = date(2025, 3, 18)\n'
            '\n'
            'days_between = (date2 - date1).days\n'
            'print(f"Number of days between {date1} and {date2}: {days_between}")'
        ),
    },
    tool_call_id='toolu_01TXXnQ5mC4ry42DrM1jPaza',
    part_kind='tool-call',
)
I also managed to run it against Mistral Small 3.1 (15GB) running locally using Ollama (I had to add "Use your python tool" to the prompt to get it to work):
ollama pull mistral-small3.1:24b

uv run --with devtools --with pydantic-ai python -c '
import asyncio
from devtools import pprint
from pydantic_ai import Agent, capture_run_messages
from pydantic_ai.models.openai import OpenAIModel
from pydantic_ai.providers.openai import OpenAIProvider
from pydantic_ai.mcp import MCPServerStdio

server = MCPServerStdio(
    "deno",
    args=[
        "run",
        "-N",
        "-R=node_modules",
        "-W=node_modules",
        "--node-modules-dir=auto",
        "jsr:@pydantic/mcp-run-python",
        "stdio",
    ],
)

agent = Agent(
    OpenAIModel(
        model_name="mistral-small3.1:latest",
        provider=OpenAIProvider(base_url="http://localhost:11434/v1"),
    ),
    mcp_servers=[server],
)

async def main():
    with capture_run_messages() as messages:
        async with agent.run_mcp_servers():
            result = await agent.run("How many days between 2000-01-01 and 2025-03-18? Use your python tool.")
    pprint(messages)
    print(result.output)

asyncio.run(main())'
Here's the full output including the debug logs.
Image segmentation using Gemini 2.5

Max Woolf pointed out this new feature of the Gemini 2.5 series (here’s my coverage of 2.5 Pro and 2.5 Flash) in a comment on Hacker News:
[... 1,428 words]To me, a successful eval meets the following criteria. Say, we currently have system A, and we might tweak it to get a system B:
- If A works significantly better than B according to a skilled human judge, the eval should give A a significantly higher score than B.
- If A and B have similar performance, their eval scores should be similar.
Whenever a pair of systems A and B contradicts these criteria, that is a sign the eval is in “error” and we should tweak it to make it rank A and B correctly.
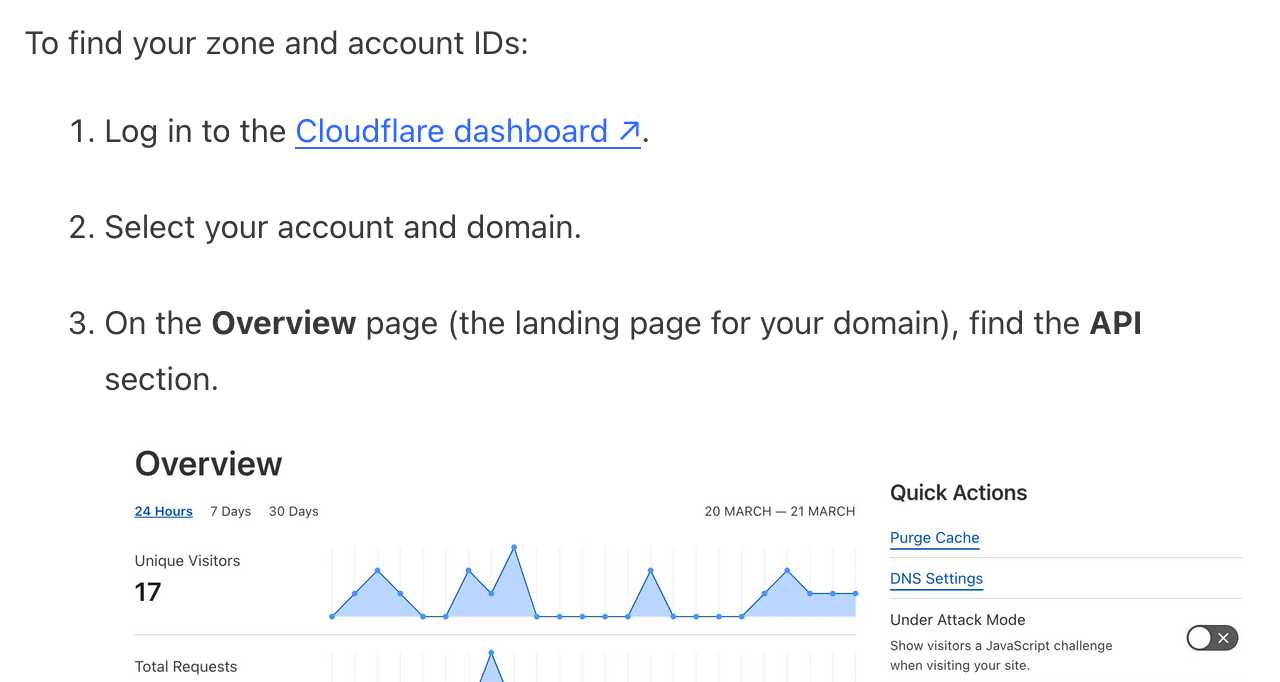
It frustrates me when support sites for online services fail to link to the things they are talking about. Cloudflare's Find zone and account IDs page for example provides a four step process for finding my account ID that starts at the root of their dashboard, including a screenshot of where I should click.
In Cloudflare's case it's harder to link to the correct dashboard page because the URL differs for different users, but that shouldn't be a show-stopper for getting this to work. Set up dash.cloudflare.com/redirects/find-account-id and link to that!
... I just noticed they do have a mechanism like that which they use elsewhere. On the R2 authentication page they link to:
https://dash.cloudflare.com/?to=/:account/r2/api-tokens
The "find account ID" flow presumably can't do the same thing because there is no single page displaying that information - it's shown in a sidebar on the page for each of your Cloudflare domains.